Sunday 13 March 2022

File Upload - Server-Side Validation – Using Magic Numbers - THM Labs


For this blog I am using the lab provided by TryHackMe. TryHackMe provides many different labs for understanding security concepts. I am using these labs to cover my OSCP basics.


What is a Magic Number?

A magic number is a number that is embedded at or near the beginning of the file which indicates that the file is of the desired format. The number is not visible to us. Every file has a number that represents the name of the file types which is in hexadecimal format.

For example: PDF file: 25 50 44 46

                         JPG file: FF D8 FF

                         GIF file :  47 49 46 38 37 61

In the example provided below we are going to try this method; we are trying to change the initial signatures of the file that is provided and try to upload a shell file. Let’s consider the below provided application.

1. In the application that is provided below we are able upload only gif files on the application.


2. 
When we upload a valid gif file, we get the below response from the application.


3. We had also run Gobuster to brute force the files that we can try to access on the application. And from the results we were able to see that the /graphics and /assets were the folders that are present on the server.


4. Now we try to get the PHP shell file and change the IP address to the IP address of the system where we need our reverse shell session. As in my case the IP is 10.10.109.115. Please click on the link to download the shell file.


5. Verify the file type of the shell and we can see that it is an file ASCII text file.


6. 
Now use a tool such as hexedit to edit the initial file signature, as provided in the screenshot below.
Note: While making these changes, please make sure that there are no changes made to the PHP shell code. The Magic number for gif is 47 49 46 38 37 61


7. 
After we edit the file, verify if the file is still an ASCII text file or is it changed to the GIF file.


8. 
Now we upload this file on the application and check if it gets uploaded. Make sure that the uploaded file is PHP file.


9. Before accessing the file, we need to initiate the netcat session and start listening on the provided port in my case the port that I have provided in the shell file is 1234.


10. 
Now we can access the file on the browser with the file path provided (<URL>/graphics/<filename>). Now we can see that the reverse shell connection is provided to us and we were able to access the flag by changing the directory to var/www.


Finally, we have it here.

Thanks for going through the whole blog!!!

Click on the links to read my previous blogs on file upload
  

    1. Client-Side Validation Bypass


Sunday 6 March 2022

Vulnerable File Upload - Server-Side Validation Bypass (Bypassing the blacklisting) - THM Labs


Well, Hello and welcome back to my blogs!!!

This blog uses a TryHackMe lab which provides the premium labs and helps beginners to understand the application security in depth both offensive and defensive labs are present on it.

The following blog gives insight on the blacklisting of the file types by the application and how we can bypass this filter.

Client-side filters are easy to bypass -- you can see the code for them, even if it's been obfuscated and needs processed before you can read it; but what happens when you can't see or manipulate the code? Well, that's a server-side filter. In short, we must perform a lot of testing to build up an idea of what is or is not allowed through the filter, then gradually put together a payload which conforms to the restrictions.

For the first part of this task, we'll take a look at a website that's using a blacklist for file extensions as a server-side filter. There are a variety of different ways that this could be coded, and the bypass we use is dependent on that. In the real world we wouldn't be able to see the code for this, but for this example, it will be included here:

<?php

    //Get the extension

    $extension = pathinfo($_FILES["fileToUpload"]["name"])["extension"];

    //Check the extension against the blacklist -- .php and .phtml

    switch($extension){

        case "php":

        case "phtml":

        case NULL:

            $uploadFail = True;

            break;

        default:

            $uploadFail = False;

    }

?>

The code explains that there is a blacklisting present on the application which accepts all the other file types apart from .php and .phtml. There are many different file types which might be used and a shell can be accessed.

In this instance, the code is looking for the last period (.) in the file name and uses that to confirm the extension, so that is what we'll be trying to bypass here. Other ways the code could be working include searching for the first period in the file name or splitting the file name at each period and checking to see if any blacklisted extensions show up. We'll cover this latter case later, but in the meantime, let's focus on the code we've got here.

However, there are a variety of other more rarely used extensions available that webservers may nonetheless still recognise. These include: .php3, .php4, .php5, .php7, .phps, .php-s, .pht and .phar. Many of these bypasses the filter (which only blocks.php and .phtml), but it appears that the server is configured not to recognise them as PHP files, as in the below example:

Let’s consider an example provided below and understand how to bypass the server-side filter provided below.

We have got a demo web application where we are able to upload any file apart from php and .phtml.


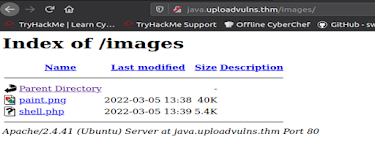
We were able to see that there are two directories present on the application as shown in the image below


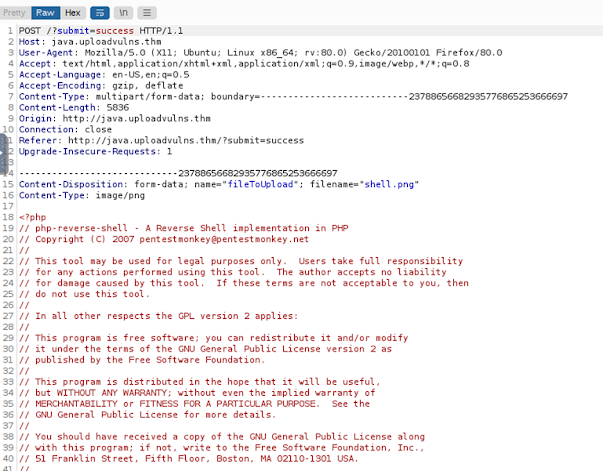
We modified the reverse shell script and with the system IP address with different extension such as php5 and .php.jpg and tried to upload these shell files on the application. We have used a PHP shell as the application is a PHP based application.


We were able to upload these files as the file types that are blacklisted by the application are not used. We were able to just view the .php.jpg file but we were not able to execute this file to receive a reverse shell connection.


Note: We need to use netcat to listen to the connection on the provided port in my case it is on port 1234.

We were able to access the files that are stored on the application by traversing through the URL and we received a reverse shell connection on the port where netcat was listening and we were able to access the shell.


Well, that is it!!!!! We were able to bypass the blacklisting of the application. In my Next blog we will talk about bypassing the whitelisting of the application using Magic Numbers.

Click on the link to go through the client-side validation bypass.

Click on the link to go through the Server-side Validation bypass using magic numbers


Till then Enjoy Hacking!!!!! 


Saturday 5 March 2022

Vulnerable File upload - Client Side Validation Bypass - THM Labs


Well I am back after a long gap, hopefully will be regular from now. This is the TryHackMe lab on file upload lab. Please enjoy the blog and try it out for yourself.
The lab that is used is http://java.uploadvulns.thm.

There are four easy ways to bypass your average client-side file upload filter:

  1. Turn off Javascript in your browser -- this will work provided the site doesn't require Javascript to provide basic functionality. If turning off Javascript completely will prevent the site from working at all then one of the other methods would be more desirable; otherwise, this can be an effective way of completely bypassing the client-side filter
  2.       Intercept and modify the incoming page. Using Burp suite, we can intercept the incoming web page and strip out the JavaScript filter before it has a chance to run. The process for this will be covered below.
  3.       Intercept and modify the file upload. Where the previous method works before the webpage is loaded, this method allows the web page to load as normal but intercepts the file upload after it's already passed (and been accepted by the filter). Again, we will cover the process for using this method during the task.
  4.       Send the file directly to the upload point. Why use the webpage with the filter, when you can send the file directly using a tool like curl? Posting the data directly to the page which contains the code for handling the file upload is another effective method for completely bypassing a client-side filter. We will not be covering this method in any real depth in this tutorial, however, the syntax for such a command would look something like this: 
           curl -X POST -F "submit:<value>" -F "<file-parameter>:@<path-to-file>" <site>.
           
            To use this method, you would first aim to intercept a successful upload (using Burp suite or the  browser console) to see the parameters being used in the upload, which can then be slotted  into the above command.


Let’s consider an example:

An application as provided in the screenshot below is having a client-side validation provided for the files that are uploaded into the application.


The code that validates the application is provided below:

            window.onload = function(){

            var upload = document.getElementById("fileSelect");

            var responseMsg = document.getElementsByClassName("responseMsg")[0];

            var errorMsg = document.getElementById("errorMsg");

            var uploadMsg = document.getElementById("uploadtext");

            upload.value="";

            upload.addEventListener("change",function(event){

                        var file = this.files[0];

                        responseMsg.style = "display:none;";

                        if (file.type != "image/png"){

                                    upload.value = "";

                                    uploadMsg.style = "display:none;";

                                    error();

                        } else{

                                    uploadMsg.innerHTML = "Chosen File: " + upload.value.split(/(\\|\/)/g).pop();

                                    responseMsg.style="display:none;";

                                    errorMsg.style="display:none;";

                                    success();

                        }

            });

};

The JS code explains that a function is called when the file is selected to upload, it verifies that the file is PNG file or not. If the file is a PNG file than the file is uploaded into the application else an error message is served.

For example, if the JPG file is uploaded than an error message is served as shown in the screenshots below.


If a valid PNG file is uploaded than the application provides a different message as provided below


Now let’s try to bypass the client-side validation and try to upload a shell file. Please click on the link to download the shell file. The reverse shell file is a PHP reverse shell file. It is used because the application is a PHP application.


Change the IP to the IP address of your machine that you are working on. And the port is basically where we get the reverse shell connection.

Now change the file format of the shell file to png file (shell.png) as provided below


Gobuster tool is ran on the application to check what are the files that are accessible to the user. The folders that we were able to access are /images and assets. 


Now let’s upload the file on the browser and intercept the request into burp and change the file format back to .php file. So that we can execute it on the application to get the reverse shell execution.


Now change the filename to shell.php and Content type to text/x-php.


And forward the request from burp and we can see that the file is uploaded on the server.


Now open the terminal and run it on the port that is provided in the shell that is uploaded in my case it on port 1234. And now access the shell.php file that is present on the server. After this we will see that a reverse shell connection is received on the terminal and we were able to access the file that was present in /var/www.


Now try it for yourself !!!! Hope you enjoyed and Happy Hacking..

The next blogs that I am going to write are on the Server side validation bypass Magic Numbers

Click on the link to read about the server side validation ( black listing bypass).

Click on the link to read about the server side validation using magic numbers


You guys can support