
Well I am back after a long gap, hopefully will be regular from now. This is the TryHackMe lab on file upload lab. Please enjoy
the blog and try it out for yourself.
The lab that is used is http://java.uploadvulns.thm.
There are
four easy ways to bypass your average client-side file upload filter:
- Turn off Javascript in your browser -- this will work provided the site doesn't require Javascript to provide basic functionality. If turning off Javascript completely will prevent the site from working at all then one of the other methods would be more desirable; otherwise, this can be an effective way of completely bypassing the client-side filter
- Intercept and modify the incoming page. Using Burp suite, we can intercept the incoming web page and strip out the JavaScript filter before it has a chance to run. The process for this will be covered below.
- Intercept and modify the file upload. Where the previous method works before the webpage is loaded, this method allows the web page to load as normal but intercepts the file upload after it's already passed (and been accepted by the filter). Again, we will cover the process for using this method during the task.
- Send the file directly to the upload point. Why use the webpage with the filter, when you can send the file directly using a tool like curl? Posting the data directly to the page which contains the code for handling the file upload is another effective method for completely bypassing a client-side filter. We will not be covering this method in any real depth in this tutorial, however, the syntax for such a command would look something like this:
Let’s
consider an example:
An
application as provided in the screenshot below is having a client-side
validation provided for the files that are uploaded into the application.

The code
that validates the application is provided below:
window.onload =
function(){
var upload =
document.getElementById("fileSelect");
var
responseMsg = document.getElementsByClassName("responseMsg")[0];
var errorMsg
= document.getElementById("errorMsg");
var
uploadMsg = document.getElementById("uploadtext");
upload.value="";
upload.addEventListener("change",function(event){
var
file = this.files[0];
responseMsg.style
= "display:none;";
if
(file.type != "image/png"){
upload.value
= "";
uploadMsg.style
= "display:none;";
error();
}
else{
uploadMsg.innerHTML
= "Chosen File: " + upload.value.split(/(\\|\/)/g).pop();
responseMsg.style="display:none;";
errorMsg.style="display:none;";
success();
}
});
};
The JS code
explains that a function is called when the file is selected to upload, it
verifies that the file is PNG file or not. If the file is a PNG file than the
file is uploaded into the application else an error message is served.
For example,
if the JPG file is uploaded than an error message is served as shown in the
screenshots below.

If a valid
PNG file is uploaded than the application provides a different message as
provided below


Now let’s
try to bypass the client-side validation and try to upload a shell file. Please
click on the link to download the shell file. The reverse shell file is
a PHP reverse shell file. It is used because the application is a PHP
application.

Change the
IP to the IP address of your machine that you are working on. And the port is
basically where we get the reverse shell connection.
Now change
the file format of the shell file to png file (shell.png) as provided below

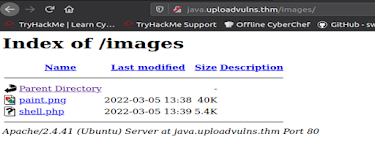
Gobuster tool is ran on the application to check what are the files that are accessible to the user. The folders that we were able to access are /images and assets.

Now let’s upload the file on the browser and intercept the request into burp and change the file format back to .php file. So that we can execute it on the application to get the reverse shell execution.
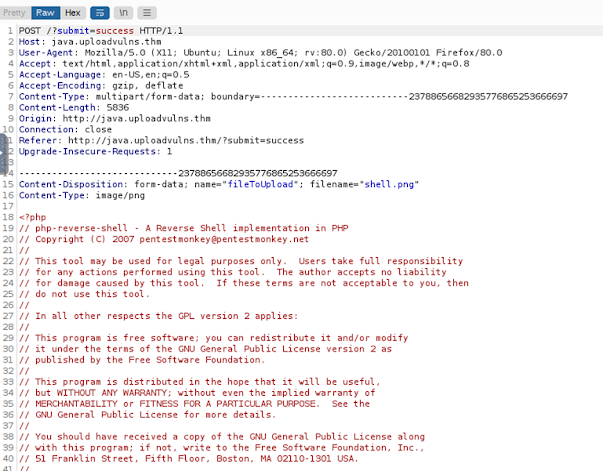
Now change
the filename to shell.php and Content type to text/x-php.

And forward the request from burp and we can see that the file is uploaded on the server.
Now open the
terminal and run it on the port that is provided in the shell that is uploaded
in my case it on port 1234. And now access the shell.php file that is present on
the server. After this we will see that a reverse shell connection is received on
the terminal and we were able to access the file that was present in /var/www.


Now try it for yourself !!!! Hope you enjoyed and Happy Hacking..
The next blogs that I am going to write are on the Server side validation
bypass Magic Numbers
Click on the link to read about the server side validation ( black listing bypass).
Click on the link to read about the server side validation using magic numbers

You guys can support
No comments:
Post a Comment