Saturday, 12 February 2022

Insecure Deserialization - TryHackMe - OWASP top 10 series

Hi all, In this series I am not covering all the TOP 10 but I am planning to cover the difficult and new ones at this point but soon I will also have a blog on the most popular ones too. Lets start than


Insecure Deserialization is a vulnerability which occurs when untrusted data is used to abuse the logic of an application. Simply, insecure deserialization is replacing data processed by an application with malicious code; allowing anything from DoS (Denial of Service) to RCE (Remote Code Execution) that the attacker can use to gain a foothold in a penetration testing scenario.

Ultimately, any application that stores or fetches data where there are no validations or integrity checks in place for the data queried or retained. A few examples of applications of this nature are:

·         E-Commerce Sites

·         Forums

·         API's

·         Application Runtimes (Tomcat, Jenkins, Jboss, etc)

A prominent element of object-oriented programming (OOP), objects are made up of two things:

  • State
  •  Behaviour

Simply, objects allow you to create similar lines of code without having to do the legwork of writing the same lines of code again.

For example, a lamp would be a good object. Lamps can have different types of bulbs, this would be their state, as well as being on/off - their behaviour!

Rather than having to accommodate every type of bulb and whether that specific lamp is on or off, you can use methods to simply alter the state and behaviour of the lamp.

What Does Serialization and Deserialization mean?

Serialisation is the process of converting objects used in programming into simpler, compatible formatting for transmitting between systems or networks for further processing or storage.

 Alternatively, deserialisation is the reverse of this; converting serialised information into their complex form - an object that the application will understand.

Let’s consider an example to understand the process.

Say you have a password of "password123" from a program that needs to be stored in a database on another system. To travel across a network this string/output needs to be converted to binary. Of course, the password needs to be stored as "password123" and not its binary notation. Once this reaches the database, it is converted or deserialized back into "password123" so it can be stored.


Simply, insecure deserialization occurs when data from an untrusted party/user gets executed because there is no filtering or input validation; the system assumes that the data is trustworthy and will execute it no holds barred.

Let’s take an instance from the TryHackMe labs and start working on it and exploit the insecure deserialization vulnerability


Step 1: Access the application and create a demo account to access the functionality of the application


Step 2: A demo account is created and after the creation of the demo account we do check what data is present in the cookies present by using inspect element.


Step 3: After Inspecting the cookie values, we were able to see that the user sensitive data is provided in the cookie values. The session ID data that is provided is a base 64 data which will provide the First flag. The “userType” cookie help us to know what kind of the user permissions are provided for the user to access the application.

            What if we can change the user to be an admin of the application? Let’s try to be an admin.


Step 4: Change the “userType” cookie value to “admin” and modify the URL to /admin. And try accessing the admin page. And you find your second flag on the UI. As here we can see that the server is accepting the cookie values that are provided by the malicious user with out validating. So, as per the definition “Insecure Deserialization is a vulnerability which occurs when untrusted data is used to abuse the logic of an application”.


Step 5: Let’s Try performing a more Nefarious attack than just changing the cookies to know about the infamous Insecure Deserialization attack. Now change the “userType” cookie value and traverse to /myprofile page and access the “Exchange your vim” module.


Step 6: After this click on “Provide your feedback!” and you are redirected to a form. Where any comments can be written. Now let’s understand the situation and try to think what makes this feature vulnerable.

When we click on the “Exchange your vim” option a cookie is encoded and stored in the browser which is perfect for us to modify. And when we click on the feedback form the cookie data is decoded then deserialized. This Vulnerability exploits Python Pickle. A link to understand this issue is provided in the end of the blog.
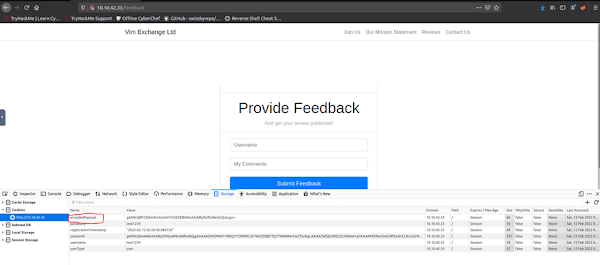


Now let’s start exploiting this feature to get RCE on the server.

Step 7: Because the code being deserialized is from a base64 format, we cannot just simply spawn a reverse shell. We must encode our own commands in base64 so that the malicious code will be executed. 


From the code above we can see that a reverse shell is created, and the IP of the system where the VPN is running is provided and the PORT where we can listen is provided. And after this the malicious code is converted into the base 64 data


Step 8: Initiate netcat and start listening on port 4444.
 

Copy the Highlighted payload and paste it into the “encodedPayload” cookie data and refresh the webpage.


Step 9: We can see on the netcat tab that we have received a connection on the port 4444. By using it we were able to fetch the flag.


Summary: By completion of the lab provided by TryHackMe on Insecure Deserialization. The points to remember while testing for Insecure Deserialization bugs are :

1. Check for where the application does not validate the user provided input.
2. Depending upon the function and the functionality where the user input is not validated the severity of the issue can vary.
3. The Vulnerability can only be executed if the user provided unvalidated input persists/stores on the server.

Remediation for Insecure Deserialization.

  • Implementing integrity checks such as digital signatures on any serialized objects to prevent hostile object creation or data tampering.
  • Enforcing strict type constraints during deserialization before object creation as the code typically expects a definable set of classes. Bypasses to this technique have been demonstrated, so reliance solely on this is not advisable.
  • Isolating and running code that deserializes in low privilege environments when possible.
  • Logging deserialization exceptions and failures, such as where the incoming type is not the expected type, or the deserialization throws exceptions.
  • Restricting or monitoring incoming and outgoing network connectivity from containers or servers that deserialize.
  • Monitoring deserialization, alerting if a user deserializes constantly.

Thats all Folks!!!!!


Sunday, 30 January 2022

XXE(XML External Entity) - TryHackMe - OWASP TOP 10


Finally I am here with the topic that I was frightened for no reason. Now I am happy that I did not gave in for my fears.


An XML External Entity (XXE) attack is a vulnerability that abuses features of XML parsers/data. It often allows an attacker to interact with any backend or external systems that the application itself can access and can allow the attacker to read the file on that system.


There are two types of XXE attacks: in-band and out-of-band (OOB-XXE).


1) An in-band XXE attack is the one in which the attacker can receive an immediate response to the XXE payload.

2) out-of-band XXE attacks (also called blind XXE), there is no immediate response from the web application and attacker must reflect the output of their XXE payload to some other file or their own server.

What is XML?

XML (eXtensible Markup Language) is a markup language that defines a set of rules for encoding documents in a format that is both human-readable and machine-readable. It is a markup language used for storing and transporting data. 

Every XML document starts with an XML Prolog.

<? xml version=”1.0” encoding=”UTF-8”?>

In the above provided syntax the XML document version and encoding type is provided. It is not mandatory to have the prolog but it is considered as a good practice.Let’s consider the below provided example:

<? xml version=”1.0” encoding=”UTF-8”?>

 <mail>

  <to>test111</to>

  <from>boost</from>

<subject>About XXE</subject>

<text>Teach about XXE</text>

 </mail>


The <mail> element is the ROOT element of the XML file. It would be considered as invalid XML file if there is root element present within it.

All the other elements are called as children element. The XML element also has attributes present such as “message” and “category”.

XXE – DTD

DTD stands for Document Type Definition. A DTD defines the structure and the legal elements and attributes of an XML document.

Let us try to understand this with the help of an example. Say we have a file named “test.dtd” with the following content.

<!DOCTYPE note [ <!ELEMENT note (to,from,heading,body)> <!ELEMENT to (#PCDATA)> <!ELEMENT from (#PCDATA)> <!ELEMENT heading (#PCDATA)> <!ELEMENT body (#PCDATA)> ]>

. #PCDATA means parseable character data. Now we can use this DTD to validate the information of some XML document and make sure that the XML file conforms to the rules of that DTD. Lets use the previously provided example to understand how the DTD validates the XML files.

<? xml version=”1.0” encoding=”UTF-8”?>

 <mail>

  <to>test111</to>

  <from>boost</from>

<subject>About XXE</subject>

<text>Teach about XXE</text>

 </mail>

1.    !DOCTYPE note -  Defines a root element of the document named note

2.    !ELEMENT note - Defines that the note element must contain the elements: "to, from, heading, body"

3.    !ELEMENT to - Defines the to element to be of type "#PCDATA"

4.    !ELEMENT from - Defines the from element to be of type "#PCDATA"

5.    !ELEMENT heading  - Defines the heading element to be of type "#PCDATA"

6.    !ELEMENT body - Defines the body element to be of type "#PCDATA"

7.    Note: !ENTITY – Defines the item of the data that is present in the XML document.


Now we see some payloads and how do they work. 


<!DOCTYPE replace [<!ENTITY name "boost"> ]>

 <userInfo>

  <firstName>falcon</firstName>

  <lastName>&name;</lastName>

 </userInfo>


As we can see we are defining a ENTITY called name and assigning a value feast. And later we use this entity in our code.


<?xml version="1.0"?>

<!DOCTYPE root [<!ENTITY read SYSTEM 'file:///etc/passwd'>]>

<root>&read;</root> 


We use the above provided syntax to read a file from the system by defining the “ENTITY” and having it use the “SYSTEM” keyword. Here we are defining the ENTITY with the name read and we are setting the value of system to read a file from the system.


<?xml version="1.0"?>

<!DOCTYPE root [<!ENTITY read SYSTEM 'file:///home/falcon/.ssh/id_rsa'>]>

<root>&read;</root>


By executing the above the syntax, we will be able to access .ssh private key of the system. 


That's it folks!!! Will be adding few new blogs on the OWASP TOP 10 Labs ..


Monday, 24 January 2022

Broken Authentication - TryHackMe - OWASP Top 10


Authentication and session management constitute core components of modern web applications. Authentication allows users to gain access to web applications by verifying their identities. The most common form of authentication is using a username and password mechanism. 

 A user would enter these credentials, the server would verify them. If they are correct, the server would then provide the users’ browser with a session cookie. A session cookie is needed because web servers use HTTP(S) to communicate which is stateless. Attaching session cookies means that the server will know who is sending what data.

Example:

By using the TryHackMe lab try to access the IP address and access the application. try to register a username darren, you'll see that user already exists so then try to register a user darrenand you'll see that you are now logged in and will be able to see the content present only in Darren's account which in our case is the flag that you need to retrieve.

Try to login to the application and access Darren and Arthur user’s account. To login to the Darren account try creating a user with same username with a space before providing the username and access the flag. And the similar goes with the Arthur’s account.

Step 1: Try to provide username as “Darren” and create a user and an error state “The user is already registered”.


Step 2: Try to register “Darren” user with a space provided before the username and the application logs into the actual Darren user and flags are provided. The same method is applied for “Arthur” user.


The below flag is used for the Darren user in the application.


The below flag is used for the Arthur user in the application.


Remediation:

There can be various mitigation for broken authentication mechanisms depending on the exact flaw:

  • To avoid password guessing attacks, ensure the application enforces a strong password policy. 
  • To avoid brute force attacks, ensure that the application enforces an automatic lockout after a certain number of attempts. This would prevent an attacker from launching more brute force attacks.
  • Implement Multi Factor Authentication - If a user has multiple methods of authentication, for example, using username and passwords and receiving a code on their mobile device, then it would be difficult for an attacker to get access to both credentials to get access to their account.


Command Injection - TryHackMe - OWASP TOP 10 labs

Finally, back after a week-long break!!! Now I am working on my OWASP skills and the notes are as follows


Command Injection occurs when server-side code (like PHP) in a web application makes a system call on the hosting machine.  It is a web vulnerability that allows an attacker to take advantage of that made system call to execute operating system commands on the server.

ACTIVE AND BLIND COMMAND INJECTION

Active command injection will return the response to the user.  It can be made visible through several HTML elements. 

Blind command injection occurs when the system command made to the server does not return the response to the user in the HTML document.


ACTIVE COMMAND INJECTION EXAMPLE

Let’s consider a scenario where the company called Evil Corp. is working on a web-based shell but accidently exposed it to the internet. Now let’s see how we can use this vulnerability to exploit. 


In the pseudo code provided above

1.    In the line 2, we check if the parameter “commandString” is set.

2.    In the line 4, the input “commandString” gets passed as the input.

3.    From the line 5, the program gets into the try block to execute the “passthru” command.

4.    The passthru() function is like the exec() function in that it executes a command. This function should be used in place of exec() or system() when the output from the Unix command is binary data which needs to be passed directly back to the browser.

5.    If the try fails, output the error to page.  Generally, this won't output anything because you can't output stderr but PHP doesn't let you have a try without a catch.

Ways to detect Active Command Injection

We know that active command injection occurs when you can see the response from the system call. The function “passthru()” is basically passing the response directly to the document. The function call here to “passthru()” may not always be what's happening behind the scenes, but I felt it was the easiest and least complicated way to demonstrate the vulnerability.

Commands to try
                Linux

                To learn more about the commands below use man <command>

·         whoami – provides the username of the current user

·         id – provides the user and group names and IDs (UID and group ID)

·         ifconfig/ip addr – Provides the IP address of the system it is executed on

·         uname -a – Print all the system information

·         ps -ef – snapshot of all the running process (ps), -e option is to select all process,  -f full format.

                Windows

                To learn more about the commands below use <command> help

·         whoami – provides the username of the current user

·         ver – provides the windows version that is running on the server

·         ipconfig - Provides the IP address of the system it is executed on

·         tasklist – provides the list of tasks that are running on the server

·         netstat -an – Provides all connected and listening ports and displays all address and ports in numerical form

Questions:

1. What strange text file is in the website root directory?

Answer: drpepper.txt


2. How many non-root/non-service/non-daemon users are there?

Answer: 0


3. What user is this app running as?

Answer: www-data


4. What is the user's shell set as?

Answer: /usr/sbin/nologin


5. What version of Ubuntu is running?

Answer: 18.04.4 LTS


6. Print out the MOTD.  What favorite beverage is shown?

Answer: DR PEPPER

In App:


In Terminal:


That's All folks for now.